
Last week we had a business use-case to support several ETL operations. Most of the operations read from JDBC source and then write to different sinks like Mongo or Kafka or HDFS. Spring X D seemed a very neat solution that needed less/almost no coding. However we soon hit a deadlock as what we wanted was somehow not getting addressed. However in this post, I would like to write about how we can quickly get started with spring X D.
Installation
Installation of SpringXD is pretty simple. All you need to do is make sure that you have Java SDK installed in your machine and have JAVA_HOME set, so that spring X D can find it. Once you make sure that you have JAVA setup, all you need is to download: SpringXD distribution.
Whats Spring X D
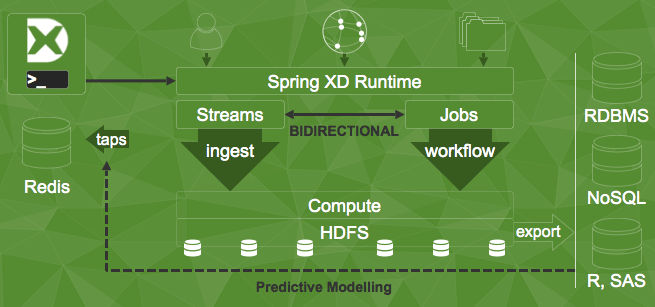
Spring X D is a nice unified platform that can be used for Stream and Batch processing. Spring X D packs in several spring projects that you use in your day to day life like Spring MVC, Spring Data, Spring Batch, Spring Integration etc.
Getting Started
1. Unzip the Spring X D Distribution folder. You should see the following subdirectories:
- LICENSE
- README
- docs
- gemfire
- hsqldb
- python
- redis
- shell
- x d
- zookeeper
I am using Spring X D’s 1.3.1.RELEASE version. To get started navigate to the x d folder.
2. To start off tour spring X D project. go to x d/bin. Run xd-singlenode . This is a nice bash script that starts up a single node instance of Spring X D.
3. Now before you move ahead, look at what the configs are. The configs that load up by default are present in x d/config/servers.yml
If you want to just run the standalone instance in one environment you can go and uncomment the relevant sections in there. You can change the jdbc source configs, like change the hostUrls, add secrets and mention driver name. You can set up the kafka and zookeeper configs too.
4. However more often than now you will have multiple environments like dev, QA and prod. In order to make the configs environment specific, you can create
servers-{envName}.yml
Spring X D is a spring boot app, so you can expose the environment like expose SPRING_PROFILES_ACTIVE=envName.
5. You can quickly start up the Spring X D shell by going to shell folder on the root and do /bin/xd-shell to start up the shell.
6. Once you get in to the shell you can do:
stream create –definition “time | log” –name ticktock –deploy
Here you just created a Stream thats going to log the System time every second. This is a Spring X D DSL where time is the source and log is the sink. Name of this stream is ticktock.
The pattern that Spring X D uses is source|process|sink.
7. The way the DSL works is that, Spring X D has several already inbuilt modules for source and sink. To find out what go to : XD/modules/. You will see:
- common
- job
- processor
- sink
- source
You can now deep dive into each of these folders and see what all support spring X D has. For instance, you will have time module inside the source folder and log module in the sink.
8. Sample DSL for a task which requires moving data from JDBC based SQL databases to Mongo:
stream create –definition “jdbc –url=jdbc:hsqldb:hsql://localhost:9101/mydb –query=’select * from testfoo’ | mongodb –databaseName=test –collectionName=names”
9. When you create a Stream or a Job, Spring X D gives a nice Admin UI where you can see all the streams that have been created, their deployment state and you can also un-deploy streams/jobs from the UI. Generally you will find the admin UI running on port: 9393.
That’s it for now. In the next post I am going to discuss about how to interact with Spring X D from your spring boot app, API support, creating custom modules, registering jobs and much more.
If you are wondering why I have a space between X & D, its because wordpress is converting X D into emoticon 😦
Stay tuned. !!
